Thursday 27 December 2012

IHSW, Christmas baking and more

I hope you all had a great Christmas and are now enjoying that quieter time of year between Christmas and the new year - at least it always is for me. Now on to the updates:
I didn't get as much embroidery done as planned during the weekend as I was still recovering from being ill - needed lots of sleep so it was good the ids were at ex's for the weekend. All I managed was a small start on the air side of the next biscornu that goes with the fire and water one. No photo's of that right now as it's too dark to take photo's and ecru on white really doesn't show up well.
As every year I did some Christmas baking - this year I started with cookies on Monday using Sugarbelle's recipe and put them away till I had more time to ice them, which I did on Sunday. The plan was to ice them using royal icing as per her recipe but the amounts were too large so I stuck with the recipe on the Wilton's meringue powder packet. The cookies are delicious and having seen that Sugarbelle used flavouring in her icing I decided to do that too and made the icing lemon flavoured using lemon zest. One thing I found out is that my hands really, really don't like piping for any length of time (outlining more than 3 cookies actually lol) so i decided to go with the quick and dirty method of no outlining and either spreading it on or using shaped tips to pipe allover patterns.  Not the best looking but they taste good so who cares - my kids certainly don't... they loved them!
In between making the cookies and icing them I did a lot more - first of course was to get the tree up and decorated and get my Lego Christmas Village out. This year I used the bauble boxes and a white sheet set up under the tree to put the village on and it really does look good at night when the lights are off but the tree is still lit. The kids always have a lot of fun playing with this and used the angled slopes between the different levels of the boxes as ski slopes for the Lego skiers.
On the Thursday before Christmas it was time for the bi-annual Christmas fair at the kids school so it was time for me to bake something for them to sell there - this year they wanted 48 mini cupcakes so that's what I made for them a couple of hours before the fair so they were at their freshest.  Half were chocolate and the other half vanilla topped with a same flavoured butter cream icing. (I'd used a different recipe than I usually do - a local sweetshop was selling this packet of powder to make the butter cream with but I didn't really like the end result so threw the rest of the packet away.)
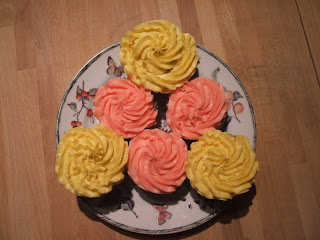
However my baking wasn't done for the day as I also wanted to send the kids to school with cupcakes for their classmates and also some for the teachers lounge as I do every year. I needed 30 for youngest's class and 27 for oldest's class and at least 50 for the teachers lounge to make sure there was enough for all the teachers AND the admin team. In the end I baked 114 large cupcakes in 5 flavours: Vanilla, chocolate, strawberry, caramel and apple/cinnamon. I had some batter leftover from baking 2 full trays of each flavour (except chocolate which I only had enough better to make 1 1/2 trays)so I put the leftovers into the mini cupcake tins and ended up with an additional 36 mini cupcakes. I iced each flavour with the same flavour icing, except the apple/cinnamon ones which I iced with lemon butter cream (which as you may notice I didn't have enough of to completely ice everything).  Taking them to the school was a bit of a challenge till I thought of using the (cleaned out) bauble boxes to carry them in.
In the morning I helped the kids get to their classes with their boxes and then went home for some much needed coffee before taking the box you see above in a sneak ninja delivery attack to the school. Since they have an open door policy at the kids school I was able to sneak in, sneak into the teachers lounge, grab some serving dishes and put the cupcakes out and sneak off again without begin seen - the cupcake fairy strikes again! Of course they did know "who dunnit" due to the kids taking the same to their classes but it's still fun to do the cupcake fairy bit.
On Saturday I had the house full of kids so I baked another batch of cupcakes and surprised the kids with them - I made half vanilla and the other half strawberry. The kids and their friends were overjoyed and the cupcakes did their usual disappearing trick.
Somehow or another I was all ready on Christmas Eve despite starting the preparations a week late due to the illness I had the week before, so I decided to try my hand at baking an 8 strand braided bread. As you can see it didn't exactly look "right" as I'd misunderstood the braiding instructions, thought it looked weird (which it did) and then made some adjustments, which didn't need to be done at all. However it tasted good and went well with our Christmas Eve table grill meal (we usually do this on boxing day but due to the kids going to ex on boxing day we moved it to Christmas eve)

Overall it was a  busy week baking and doing stuff but the effort was certainly worth the end results!

Friday 14 December 2012

IHSW and TUSAL

This months TUSAL jar is pretty full again. At the bottom the threads from the Christmas cards, then the Movember beer ghost and the biscornu as well as some threads from UFO #8 which is again hiding in the attic where I find it's easier to work on due to the angle of the light which makes working blue on blue so much easier on my eyes. Lots of metallics, glow in the dark and normal threads this month. Next year I'll be back with another jar as I really enjoy seeing how the jars fill up and what they look like month to month.


This weekend is IHSW again - last time for this year but with this I also hope to continue next year!
I hope to start on another biscornu similar to the one I recently finished.

Not much else to report this time - I've been pretty ill this week and haven't done more more than be ill and try to get better again.

Friday 7 December 2012

Mini biscornu complete!

This is the completed biscornu I made the latest fun #stitchingpirates challenge over on deviantArt.

As you have seen over the last 2 weeks I have dyed the fabric and embroidered both sides with different threads. To finish it all I used DMC 154 (purple) to join the two sides and stuffed it with shredded cotton batting/ I used two identical heart shaped buttons to finish it off :)

I hope that whoever gets this will like this as much as I do :D

Thursday 6 December 2012

Mini biscornu side B and a bit more...

Here is the second side of the biscornu I'm making for another #stitchingpirates challenge over on deviant Art. Fortunately the challenge deadline was extended so I will be able to finish it on time. This was the first time I stitched with DMC silk threads and it was a bit of a learning curve as it behaves differently from normal DMC. As a result making this took a lot longer than usual as the necessity of pulling each stitch *tight*  as I went along was a strain on my right shoulder.

I am happy with the resulting embroidery and am going to start putting it together - I've decided to use purple DMC for the job as the join links red and blue.

Size  2 1/4" / 5,75 cm square
Fabric: 18 ct Aida
Colours used: 712 (cream), 800 (light blue), 798 (medium blue) and 820 (darkest blue)
Total number of cross stitches: 620
Total number of backstitches: 308 

One thing that happened when I was making coffee with my Senseo coffee machine for my bf a few days ago was this:
This is one of the happiest cups of coffee I have ever seen - and I didn't do anything to make it happen!

Wednesday 28 November 2012

Beer ghost by night

I had been having trouble getting a decent image of the glow in the dark thread of the beer ghost but my bf came to the rescue with his camera and saved the day! We had a little ambient light from the TV to help make the rest of the embroidery visible while also making the ghost more than visible in the dark.

Of course while we were at it we also made a new photo of the Beer ghost in the graveyard embroidery:

Camera settings for both photo's:
1 second
F/2.8
6 mm
800

Tuesday 27 November 2012

Mini biscornu side A

Here is the first side of the biscornu I'm making for another #stitchingpirates challenge over on deviant Art. As is getting normal for me I first had a go at dying the fabric before I started with the embroidery - this time I used forest fruits jam to make the paint that I swirled around on the fabric - it gives a purplish hue to the fabric that doesn't show up too well in this image.

I'm now working on the other side - in blue silk threads that I've been dying to use for something as I've been wondering how the softness would translate to cross stitch.

Size  2 1/4" / 5,75 cm square
Fabric: 18 ct Aida
Colours used: white, 973 (yellow), 947 (orange) and 666 (red)
Total number of cross stitches: 644
Total number of backstitches: 308

Monday 26 November 2012

Beer Ghost in MOvember complete!

I have no real idea how Beer Ghost managed to make himself a moustache as ghosts don't grow hair but I'm not going to ask either - some things one doesn't need to know and any way... he might want MY beer! He's looking in astonishment at the beer he was given in a pub as it's bigger than he is. He's also wondering why, when he ordered a pilsner, he got a bitter instead but, as he never wastes a beer when he sees one, that's a problem he can think over while he has this one.

As I mentioned in previous posts the embroidery of the beer did not turn out as expected as in the pattern creator it showed as a pilsner type beer but it ended up a lot darker and looks more like a bitter now. The difference in colour is probably because I mostly still have and use pre-1995 DMC. This is of significance because that's around the time they had to change how they dyed the threads due to new European laws and many colours are no longer exactly the same as they were.

All in all I'm happy with the end result even though it's not what I expected. I'm actually surprised it only took me a few days to make this.

The embroidery is 4 5/8" wide and 3 3/4" high / 11,75 cm wide x 9,5 cm high
Number of stitches: 2319
Fabric used: 18 ct / 7 squares per cm Aida
Date started: 19th November
Date completed: 25th November
There are 90 colours of DMC used in the embroidery in total - 88 in the glass of beer and 18 in the beer ghost

Saturday 24 November 2012

When things go wrong...

They keep going wrong. I fixed the lighter line near the bottom so that looks ok now but the higher up I go in the height of the glass the less like the pattern it looks and the more it looks like some weird something or another I'm hoping that somehow or another things come together but it's at least 4 shades darker than the pattern says it is so time will tell.

As you can see by comparing the two they look VERY different indeed. I have very carefully followed the pattern taking great care to use the correct colour as with a pattern with this many colours a small mistake can soon really mess things up.

At the time of writing I have only 30 colours left to do so I won't bore you with a massive list of colours used hehe.

Friday 23 November 2012

Beer Ghost gets company...

As you can see Beer Ghost has some "company"now. I'll leave you to guess who/what it is :) I'm surprised I got this far as Wednesday night I went to bed just after I'd finished tucking the kids in and yesterday I had to run around to appointments, shops and stuff which used up a lot of time. I'm moderately unhappy with the yellowish line between the brown lines near the bottom - it wasn't supposed to be this much lighter but the pattern app thought that the colour it put there was darker than it really is. I suspect that my pre 1995 colours are the cause of this more than anything and I probably will swap colours around a little to compensate and rip out that line of yellow to sort it out properly. Other than that I'm really happy with the gradients of the colours.

I'm not entirely certain I've finished with the colours I've used so I'll just list the colours used since Wednesday and see what I still need to re-use later.

Actively working with: 
918

Used but possibly not finished with:
159
341
355
444
451
740
741
775
780
781
783
919
920
921
947
970
972
975
3583
3747
3756
3776
3826

Wednesday 21 November 2012

Movember Beer Ghost

These are the colours that I will be using for my project - I'm not going to paste the list - I'll stick to saying that there are 90 colours that will be used in this project (yes I know - totally nuts)
So far I have completed SATW's Beer Ghost with his movember moustache and I'm about to start the item he's looking at with amazement. He's been stitched with glow in the dark thread and hopefully I will get a nice photo of him glowing in the dark sometime next week.

So far I have only completed 2 clours:
Black and glow in the dark.

Monday 19 November 2012

The next side project - dying the fabric

For the next project I wanted to make a more patterned background in browns so I had a look around the house for things that I could use that were brown. A look in the fridge provided me with some prune jam that rather unfortunately had decided to become a science experiment since I'd last used it so I decided that I could try with that instead of just chucking it out. I did of course first remove the science experimental bit and just used what was underneath and as yet unscientific. I made the paint in the same way as I had when I made the paints last time and it smelled rather pleasant to my relief. As you can see above I painted circles with the prune paint then i made some coffee paint and filled in the circles with it
I then let it all rest and think about life for a bit before giving it a wash in the sink with warm water and some washing up liquid. The end result is a lot less bright but it does give a nice texture for the embroidery it's made for.
 I'm happy with the result and can't wait to see what it will look like when the embroidery is complete!

IHSW November

This weekend during the IHSW November I did the above embroideries which are going to be used to make Christmas cards. Most of the patterns are from books/magazines but for the topmost Christmas tree I made the pattern myself.

Wednesday 14 November 2012

UFO/WIP updates, TUSAL and IHSW November

UFO #8 has seen some progress now that it's no longer upstairs in the attic waiting for me to work on it. I'm slowly plodding away on the boring outer border trying to get as much of that done first before I feel the need to do something else and then I'll have the background of the central part to work on. It seemed like that was a better way of doing it rather than doing the central part first and then getting stuck on the tedious single colour 6 stitch wide border.


In the mean time I've snuck in a little new project just for me for no other reason than that I like the pattern and I am in the mood to work on this - autumn leaves made with variegated threads. It's a nice thing to work on which helps me deal with all the stress I've been in lately.

The list of things I want to work on is as long as my arm - I might need to set aside the UFO for a bit while I work on them. Most of the things I want to work on are deviantArt related, the Christmas card project, something for movember, #stitchingpirates's Biscornu challenge and I ought to be working on them but for that I first need to decide on a pattern for each of them.
November's TUSAL jar is again pretty full though not as full as the October one. Since the last TUSAL update I've worked on and completed the 7th UFO - Tropical fish as well as working a bit on the 8th UFO - the star sign I mentioned above.

IHSW November is this coming weekend - don't miss out and make time to stitch! If all goes well I'll be able to find a bit of time to stitch during the weekend.

Sunday 11 November 2012

UFO #7: The last fish complete!

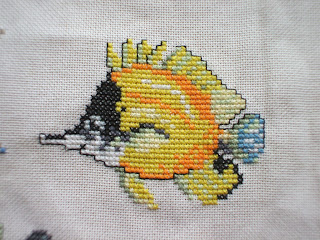
The last fish is complete at last! It's not nearly as rainbow-ish as the photo in the magazine suggested however I'm happy with the result and am glad this project is *finally* finished.

Below is the result of all these weeks/years of work - perhaps not quite the way the designer intended but it's the way I wanted it and I'm happy with the result.
I've not yet decided how to frame it - that's a decision for another day.

Saturday 10 November 2012

UFO #7: The last fish

I was tempted to crop this image so you could see the stitching more easily and then I realised that you would then not see how small it is compared to the other fish so I left it uncropped. Progress isn't going as fast as it was with the red fish but I'm getting there! Some days I get lots done - some days I don't however having to remember that I'm working in mirror image is slowing me down a little, especially when I need to start the next colour. The black bit is in the face of the fish. I have completed most of the darker green and white, all  of the lighter green and have started to do the black.

Thursday 8 November 2012

UFO #7: "red" fish completed

I'm not really sure how I managed to complete this yesterday, though staying up far too late certainly helped... but I was close to the finish of this fish and really wanted it finished As you can see it's not so red as it seemed in the magazine image so I'm extra pleased I swapped out the 760 pink for the 350 coral colour when I started this fish - I now just wish I'd chosen a replacement for the 351 (coral) as well now as it's still more pink than I'd like.

The whole embroidery now looks like this:
And this was the moment I also realised that I'd done some thing wrong with the placement of the top two fish... If you look at the bottom fish and then go back to the magazine image you will perhaps notice that the orange fish especially is much closer to the green border - this was because I'd added some space all around the embroidery when i started doing it. Of course between 1996 when I started this and now, 16 years later, I'd completely forgotten it.. till I saw how far away everything looked from where it should be compared to the two large fish at the top. I have decided that I'll leave it as is as the placement doesn't detract from the overall look of the embroidery.

This of course then makes the placement of the last fish complicated as that depends on the 3 large fish that surround it. My solution will be to find the exact middle between the fish, find the middle of  the pattern of the last fish I need to do (after flipping it to point the same way as the rest of the fish) and then embroider it from the middle. This last fish will not be the easiest to do as I'll have to remember to mentally mirror all the symbols when doing the colours.

Wednesday 7 November 2012

UFO #7: "red" fish

I'm not really sure I can call this fish red - it's more coral (that's a shade of pink for the men reading this :P ) however it's seeing quite a bit of progress since the last image I showed here. I've got quite a bit of the lightest "red"  (DMC 351 - Coral) to do still then a whole load of grey, bit of white and some pale purple (3042) to do to complete this fish.

I can feel the end of this project getting closer.. and I will be so glad when it's done!

Sunday 4 November 2012

UFO #7: Progress report

The next big fish is now complete and despite it looking as if it's mostly blue and yellow there is quite a lot of pale green in it too. There is now just one large fish left to do and a medium sized one. Not much to tell this time really so I'll move on and show you what it looks like now...

You may notice a few lines to the top right - that's the big red fish I've started embroidering already.

Just the start of the tail fin here but it will soon grow into the large red fish it is.

Saturday 3 November 2012

UFO #7: The next big fish grows

This is how far I managed to get this before I started stitching yesterday as you can see I got a bit done since the last time. Wednesday I didn't do much as I'd done another round of dead mouse clean-up and it was not very pleasant (I'll spare you the details) and once I'd done that I was not feeling well. Yesterday and today I got quite a bit more done as you can see below:
The body of the fish is completed - just need to complete the fins and tail now. It's really close to the edge of the green edging and it's supposed to be - the fish starts just 2 stitches below the edging. Can't wait to finish this one!

Tuesday 30 October 2012

UFO #7 - the next big fish

I've been busy hunting down mice in my house - silly things that thought that a cat free house would make a good winter home but are finding out that I don't like furry animals in the house at all and I had forgotten to update with my progress made on the embroidery. As you can see a goodly amount of the fish is now visible. You can see about 2/3 of the length of the fish and most of the height. I've still got a fair amount of yellow to do before I can do the misc blues that go between the yellow but first I'm doing the blue lower edge to help have enough framework to the fish.

I have not been working on UFO #8 so have no update for that.

Friday 26 October 2012

UFO #7: Big fish.. Little fish


The big fish that I hadn't completed due to the lack of the yellow is finally finished now. I thought it was the biggest one but apparently there are two this size with a similar colouring.
The little happy fish is all done - it doesn't look as orangey as it did in the photo in the magazine but it does look bright and cheerful. I finished this last night and am very happy with the result.
The whole embroidery is starting to look really nice - just 3 fish left now - a blue/yellow one, a rainbow one and a pinky/red one. I'm going to do the other large blue/yellow fish now.

Thursday 25 October 2012

UFO #7 - yellow fish update.

So far it looks anything but yellow but that will change soon. All I need to do now is a little white in the tail and along the back and then I can settle down and do the yellow. I had expected this to not take so long but I hadn't bargained on how much time the student gardener I have here today and yesterday needs from me to get stuff done. He's a good lad and works really hard but he also needs almost constant supervision, however I have discovered how to keep him going for longer: send the kids out with him. *huge evil grin* He just doesn't like working alone.

Wednesday 24 October 2012

Macaroni cheese with a difference

I always remember this as the family "Macaroni cheese" though I may have misremembered what we used to call it when I was growing up - either way it's perfect for using up leftover pasta and those bits of veg lurking in the fridge that are not enough for cooking with. Of course you don't have to use leftover pasta - you can also cook it specially for the dish, just make it while you chop the veg and use it while hot.

For 4 people (or 2-3 people with a larger appetites) this is what I used but just adjust to your taste/what you have lurking:
  •  About 400 grams pasta (that's about 250 grams "raw" pasta)
  • 125 grams diced ham or cooked bacon
  • About 250 grams grated Cheese - this can be cheddar or something else that melts nicely. I used mature Gouda as that's what I had in the house
  • 2 tablespoons fine breadcrumbs
  • 2 medium carrots - diced, 0.75 - 1 cm/1/8 - 1/4 inch
  • 2 tomatoes - diced, about 1 - 2 cm/1/2 - 3/4 inch
  • 1/3 cucumber - diced, about 1 - 2 cm/1/2 - 3/4 inch (I do this by leaving the cucumber I need on the whole cucumber and cutting down the length in a cross hatch and then "slicing" the bits off)
  • 2 spring onions sliced thinly
  • You can also use mushrooms cut into small bits, onions, courgette aubergine, etc. just don't use tinned tomatoes.
You will need a deep oven proof dish for this - I always use the dish for cheese fondue as it's oven proof, deep and large.

 How to make it:

1.  Mentally divide the pasta into 5 use 1/5 to make a layer of pasta in the oven dish.
2.  Sprinkle 1/3 of the ham over the pasta followed by the 1/3 of each of the different kinds of veg you are using.
 3.  Sprinkle 1/5 of the cheese over the top.
 
4.  Make another 2 layers like this till you have run out of ham/veg.
5.  Spread the last 2/5 of the pasta over the top of the dish.
6.  Cover with the last of the cheese.
7.  Sprinkle the bread crumbs over the top.
 8.  Bake in the oven at 200 C / 390 F for about 35 - 45 minutes.


Enjoy!