
Friday 4 December 2015
Ornament of the Month - December
Friday 6 November 2015
Ornament of the Month - November
Monday 19 October 2015
Hand dying fabric with Dylon fabric paint

Initially I was full of idea's but I can't actually paint so kept on hitting the brick wall of "this looks awful". So I ended up putting it aside as a project till I did get an idea. I'm glad I did in the end as I did get an idea of what to do and it's completely out of the box, which is more my style anyway when it comes to crafting.
If anyone reading this thinks this is a complaint then please don't as this is just me explaining why it took me so many months to get this blog post written as promised. I love a challenge and this was certainly that!
So just to be clear: although Dylon kindly sent me the paints I used, the way I used them and what I have written are entirely my own thoughts, ideas and opinions.
With that bit over it's time to tell you what I did with the paints... I used them to hand dye embroidery fabric! It might seem a bit odd but I found it works really well.

- Dylon fabric paint, I used royal blue (8) and turquoise (28) but any colour of the normal range works well.
- Small containers to mix the paint in
- Spoons or something else to stir with, one per colour paint you make
- Fabric - I used 18ct and 20ct Aida embroidery fabric
- Paintbrush
- Optional: plant spray that hasn't been used to spray chemicals.
 |
| Experiments made before I got started: drops, swirls and stripes |
- Dylon fabric paint was NOT made to be used like this and results may vary according to the material you use the paint on.
- Dylon fabric paint for dark fabric does not like being diluted and is therefore not suitable for this method.
- Before starting it's important to protect your work surface as this is going to get a bit messy. I put down a layer of newspaper and followed that with a plastic shopping bag I had cut open - a bin (garbage) bag works well too - just make sure you have plenty of space around the fabric you use.
- Any creases in the news paper or plastic bag can result in the paint pooling which can affect the end result.
- When I started this it was a huge experiment so I started on a few scraps of 18ct Aida I had left over from another project, I suggest you play around on some scraps first to see what pattern you like before working on a larger project.
- If the paints are not spreading enough either use a plant spray filled with water or dip your fingers in water and splash that on the fabric and the paint will spread more.
- Once mixed the paint keeps for a week or so if you keep it covered (or if you forget just add water and mix well)
- First you need to mix your paints. 1/2 a coffee spoon (about 2-3 ml) mixed with a tablespoon of water makes the paint thin enough to work with. Stir the mixture till all the paint is diluted
- You can mix colours! I made 4 colours using the 2 paints I chose to use:
- Just royal blue
- Just turquoise
- 1 part royal blue and 2 parts turquoise
- 2 parts royal blue and 1 part turquoise
- Hand wash your fabric to remove any sizing or other chemicals from the production process so that the fabric takes the dye.
- If you wring the fabric you might create creases which will affect the dye result, if this is what you want go for it, otherwise hold it up for a bit to let most of the water drip out.
- You need to keep the fabric wet to let the paint spread.
- Give the paint another stir before starting, this means that any bits that you missed earlier will be mixed in.
- I used a small paintbrush to make the spots and drops on the fabric.

- Start with one colour and cover the fabric with spots before moving on to the next colour
- Keep adding colours till you are happy with the result, remember that as it dries the colours will continue to spread.
 |
| I added more paint after this but sadly forgot to take a photo. |
- It will take quite some time for the fabric to dry so it's best to leave it overnight to dry.
- Heat set the fabric according to the instructions on the paint.
- Hand wash, dry and iron again to remove any creases from washing and you are ready to use your fabric for whatever you wish!
- You can see the result I got from this at the top of this post.
I hope you enjoyed this post, if you do use this to dye your own fabric I'd love to see your results!
Saturday 17 October 2015
Fob a Month - 8

With autumn on our doorstep my mind turned towards that as a theme, I chose a toadstool as that is really one of the more visible things you can see that herald autumn other than the falling of leaves. I used a lovely picture by ky-sta over on deviantArt which can be found here: Red Mushrooms 9 and did 2 things with it.
The first thing I did was do a direct pattern conversion and then reduce the colours from around 100 to a "mere" 43. I stitched this and then added small beads to create the dots of the toadstool.
The second thing I did was use the picture as an underlay over which I then placed the colours over the top to create a pattern with just 15 colours, which I also stitched.
The results are 2 different toadstools made from the same picture using mostly the same colours made into a fob. Because I chose to use brown 28ct jobelan the fob is again rather on the large side but it does make it about the right size to use as an ornament as well.

The fob is 3" round. The realistic toadstool is 29 x 28 stitches. The stylised toadstool is 29 x 25 stitches.
What you need to make the example above:
- 2 pieces of 5 1/2" square 28ct brown jobelan
- DMC in the colours on the patterns
- Mill Hill Magnifica colour: 10010
- Your stuffing of choice
- Bordeaux craft thread for the cord
- White rick rack: 11 1/2" long and about 5/16" wide
- Water soluble pen
- Matching thread to sew
- Contrasting thread to baste with

Randomly stitch the beads onto the realistic toadstool as the spots.
Use a 3" round biscuit/cookie cutter and a water soluble pen to mark a circle on the back each embroidery, making sure to keep the embroidery centred.
Use the contrasting thread to baste the rick rack onto the front of one of the embroideries, use the line on the back as your guide and make sure the rick rack is centred on the line (a bit fiddly but not too difficult) overlap the ends a little and make sure you tuck the endings into the seam line.
Cut the circle out making sure to leave a 1/4" seam allowance.
Pin the cord in the top centre of the embroidery making sure the have the loop placed on the embroidery and the ends sticking out, as you don't want the loop on the inside of your ornament when stitched *wink*
Place the two sides right sides together and pin into place making sure to line up the circles.
Starting at the bottom stitch the 2 sides together carefully making sure to sew through the rick rack and leaving about 1 1/2" to turn - don't remove the basting thread yet!
Snip the seam allowance making sure not to go too close to the sewing line and carefully turn your work the right way round.
Check to see if all is sewn down properly before removing the basting thread and sewing the fob closed.
I hope you enjoy this pattern, please do share a link to yours if you make it!
The very delayed... Fob a Month - 7
The reason it's late is mostly that when the fob was due I was in the middle of redecorating my living room and somehow after that was done I didn't get round to finishing it.
This month's fob was the brainchild of my bf who wanted to have a go at designing a cross stitch pattern as well. I made the actual pattern but the idea of it and what elements to use were his decisions. With Doctor Who starting the new season the day after this fob was due he wanted to make something that reflected the show and the time of year it started. The stories are adventures in space and time so the clock represents time and the star sign represents space, with Virgo being the star sign at the time of the first episode of the season with the added effect of hands of a clock which was quite unintentional.

The fob is 3" square. 46 stitches square.
What you need to make the example above:
- 2 pieces of 5 1/2" square 14ct black Aida
- Kreinik #4 braid: 001L, 002 and 012L
- Your stuffing of choice
- Black craft thread for the cord
You can download a clock version here: Fob a Month - Clock version
- If you prefer a clock use the alternate pattern given, remember you can set the clock to any time you like by changing the direction of the hands.
- If you would rather use another star sign go for it! Almost any star chart on the internet can be used to make it.

I used the usual method for making a biscornu and started by doing an outline of 42 backstitches per side 3 stitches away from the finished cross stitch. On the front I used copper Kreinik, on the back gold and the 2 sides were stitched together using silver which gives a really nice finish.
Remember to add the cord at the 12 O'clock position so it hangs the right way up!
I hope you enjoy this pattern, please do share a link to yours if you make it!
Friday 2 October 2015
Ornament of the Month - October
Thursday 10 September 2015
Tons of Tiny - September

First of all there is the monthly Fob a Month fob. It's 1 7/8" square and is double sided so counts as 2 Tiny's. You can find the pattern for the fob here: Fob a Month - 6.


It's been a busy month for me and I'm amazed at how much I got done! I am able to add 8 (?) more Tiny's to my total count which brings me to a total of 39 Tiny's
Friday 4 September 2015
Ornament of the Month - September

September's birthstone is Sapphire - it comes in lots of wonderful shades of blue, but my favourite is the darker blues it comes in. For me it was *finally* a chance to use my favourite blue of all: DMC 820. I'm not sure what it is about this particular blue but it's always been the one I like the most so I was very pleased I could use it for this SAL.

This month, for the first time in ages, I succeeded at completing both ornaments before it was time to post the pattern. I am in fact still 5 ornaments behind, some still needing the garland ornament made and some still needing the larger ornament made. I am determined to complete them before Christmas and was just as determined not to fall even more behind this month.

If you have stitched any of my ornaments and I don't yet know about it please do let me know. Just post a link to your blog post or the location of your photo in a comment below - I'd love to see it!
Till next time!
Joining the Dots - Part 2

If you wish to make the fob, pincushion and scissor case as a matching set you will need a piece of 18ct Aida or 32ct linen of at least 10" x 15" or 7,5" x 20" - you need to start pretty close to the edge and to one side to make sure you have enough fabric left for the rest. You need a 1/4" seam allowance for each piece so the sections must be stitched at least 1/2" away from each other using the back stitch lines as the counting point.
The scissor case is 3 3/4" square. 68 stitches square.
What you need to make the example above:
- 1 piece of 5 1/2" x 5 1/2" 18ct Aida or 32ct linen if you are ONLY stitching the scissor case - otherwise see above for the amount needed.
- DMC 3347, 3348 and 3827
- One button - I used a 1/2" heart button.
You can download the pdf pattern here: Fob a Month - 6 - Scissor Case

Once the cross stitching is done do the back stitch outlines.
Press the completed stitching from the back to make sure there are no creases. Then cut the pieces out 1/4" away from the back stitch lines.
If you want to include a tassel then make it now.
Place the 2 pieces wrong sides together, fold the seam allowances in and whip stitch the sections together, making sure you tuck the tassel between the two sides in the corner opposite to the stitched side of what will be the inside. As you do not need to turn the work or stuff it you can completely close the seam straight away.

Fold the two sides that in the pattern show as being the larger triangles outside the grey triangle towards each other. Whip stitch the sides together from the outside reusing the stitches you used to stitch the 2 sections together, it's not easy to see but you can feel the holes with your needle or use the fabric as a guide. If you do small stitches it won't matter too much if you don't do it through the previous holes.
Put your scissors in the case and fold the case closed then place your button just below the point along the seam line. Hold in it place and take the scissors out of the case. Stitch in place using a colour thread of your choice. Then make a button hole stitch loop, I used only 1 strand of floss for the starting loop but more is perhaps more practical. A nice tutorial showing how to do this can be found here: Ysolda.com: sewn button loops
Note: If you leave the button off and make a larger loop of ribbon or cord to hang it with you could use it as an ornament in the Christmas tree! Just add some sweets (candy for the USA-ians out there) or a small gift or make it on 14ct Aida or 28ct even weave so it's larger and can hold more.
I hope you enjoy this pattern, please do share a link to yours if you make it!
Next time I will give the pattern for the little needle book, which will then be the last part of this series.
Ornament of the Month - September
Sunday 30 August 2015
Tons of Tiny - July & August Edition
July:
From 11th June till 10th July I stitched the following items that count as a tiny:
August:
From 11th July till 10th August I didn't stitch as much, mostly because I went on holiday with my bf for 10 days in this time and of course I was quite busy in the run up to it. I did however find time to do the monthly fob, though I posted about it after I returned.


As all of these are single sided, that brings the grand total to 31 tiny's
Saturday 29 August 2015
Halloween SAL with Leonore and The Gang - Week 1
Leonore wanted to do a Halloween SAL using The Frosted Pumpkin Stitchery's Halloween Spooky Sampler. Leonore, Nancy
and Carla are going to stitch a square per week starting last week. The
rest of us girls are going to stitch whatever we choose AND SO CAN
YOU! How? Read more here: Halloween SAL with Leonore and The Gang
(please note I shamelessly stole the title and the above paragraph, with a few changes of my own, from Carla's post as she wrote it so well <3)
I am not the biggest fan of the cute style of The Frosted Pumpkin, though I do admire what people stitch of theirs, it's just not my style, so I decided to do a couple of things from the Just CrossStitch Halloween special.
 I am planning to do the owl from the cover, the crow on a pumpkin (I was sure it was a raven!) from page 80 and the Halloween Days sewing basket from page 88-90 if time allows. There are several other patterns that strike my fancy but I'm pretty sure I won't have time to do them too.
Over the last week I started working on the crow as the threads and fabric I'd ordered had arrived and I was keen to start something small and not green between all the green dots I have been doing for the Fob a Month project, which came so soon after all the greens of the August ornament. As my luck would have it the first colour I had to work with was green - of course lol. Fortunately it was a dark green so it was a very different green.
 I am using The Gentle Arts threads for this, in the recommended colours but I'm not stitching in rows as I didn't want stripy effect one usually gets from doing this with variegated threads. Instead I'm stitching in circles - first doing the outlines and then filling them in, which causes the more blotchy effect you see in the photo, which I personally prefer and find more natural looking. It is of course slightly more time consuming than just doing rows and may well use a bit more thread but for something small like this when I've bought the threads specially, I don't need to worry that I'll run out of thread.
I am going to complete the next bit of the polka dot set before going on to do the monthly ornament which is due on Friday and then I shall be able to work on this again - this is the downside of this being a for fun project as it's the first to be set aside when deadline stuff happens.
Till next time! And don't forget: it's not too late - you can join in too!
(please note I shamelessly stole the title and the above paragraph, with a few changes of my own, from Carla's post as she wrote it so well <3)
I am not the biggest fan of the cute style of The Frosted Pumpkin, though I do admire what people stitch of theirs, it's just not my style, so I decided to do a couple of things from the Just CrossStitch Halloween special.

Over the last week I started working on the crow as the threads and fabric I'd ordered had arrived and I was keen to start something small and not green between all the green dots I have been doing for the Fob a Month project, which came so soon after all the greens of the August ornament. As my luck would have it the first colour I had to work with was green - of course lol. Fortunately it was a dark green so it was a very different green.

I am going to complete the next bit of the polka dot set before going on to do the monthly ornament which is due on Friday and then I shall be able to work on this again - this is the downside of this being a for fun project as it's the first to be set aside when deadline stuff happens.
Till next time! And don't forget: it's not too late - you can join in too!
Friday 28 August 2015
Joining the dots - Part 1

I have made 2 different options for the pincushion - the version I made and an inverse version of the top/bottom with a simplified backstitching side panel. I only stitched the front with the polka dot pattern - I left the back empty except for the backstitch lines.
If you wish to make the fob, pincushion and scissor case as a matching set you will need a piece of 18ct Aida or 32ct linen of at least 10" x 15" or 7,5" x 20" - you need to start pretty close to the edge to make sure you have enough fabric left for the rest. You need a 1/4" seam allowance for each piece so the sections must be stitched at least 1/2" away from each other using the back stitch lines as the counting point.
The pincushion is 2" square and 1"high (approx, depends on how full you stuff it). 36 stitches square.
What you need to make the example above:
- 1 piece of 8" x 8" 18ct Aida or 32ct linen if you are ONLY stitching the pincushion - otherwise see above for the amount needed.
- DMC 3347, 3348 and 3827
- Your stuffing of choice
- 2 small crystal bicones

Instructions: Fold the fabric in half before starting - on each half you
will stitch either the back or the front AND 2 side panels at least
1/4" away from the
centre line so you have 1/4" seam allowance for each side. If you are
also doing the fob you want to stitch your pieces so they are about 1/2"
away from the back stitch lines of the fob.
Once the cross stitching is
done do the back stitch outlines.
 |
| Layout suggestion (note I noticed that the centres of the side panels in this picture are incorrect, they should be the darkest green) |
Whip stitch the sections together. I found it easier to first stitch all the side panels to the front and then stitch between the sides before adding the bottom. When you have about 1" left to stitch of the last seam take a moment to add some stuffing, you want it plump but not too plump as it would then lose it's shape and become round. Then finish sewing the last bit of seam.
Last of all sew the 2 bicones in place in the same way as you did the beads for the fob.
I hope you enjoy this pattern, please do share a link to yours if you make it!
Sunday 23 August 2015
Ornament of the Month - August
August's birthstone is Peridot - which I can spell without too much trouble despite my dyslexia (and the spell checker telling me I should write Period) but I haven't a clue how to pronounce it hehe. It's a limeish green for the most part although it does several other colour variations. I decided to head towards the lime side of things when I chose the colours for the ornament as that is the most recognisable colour when one thinks of the stone.
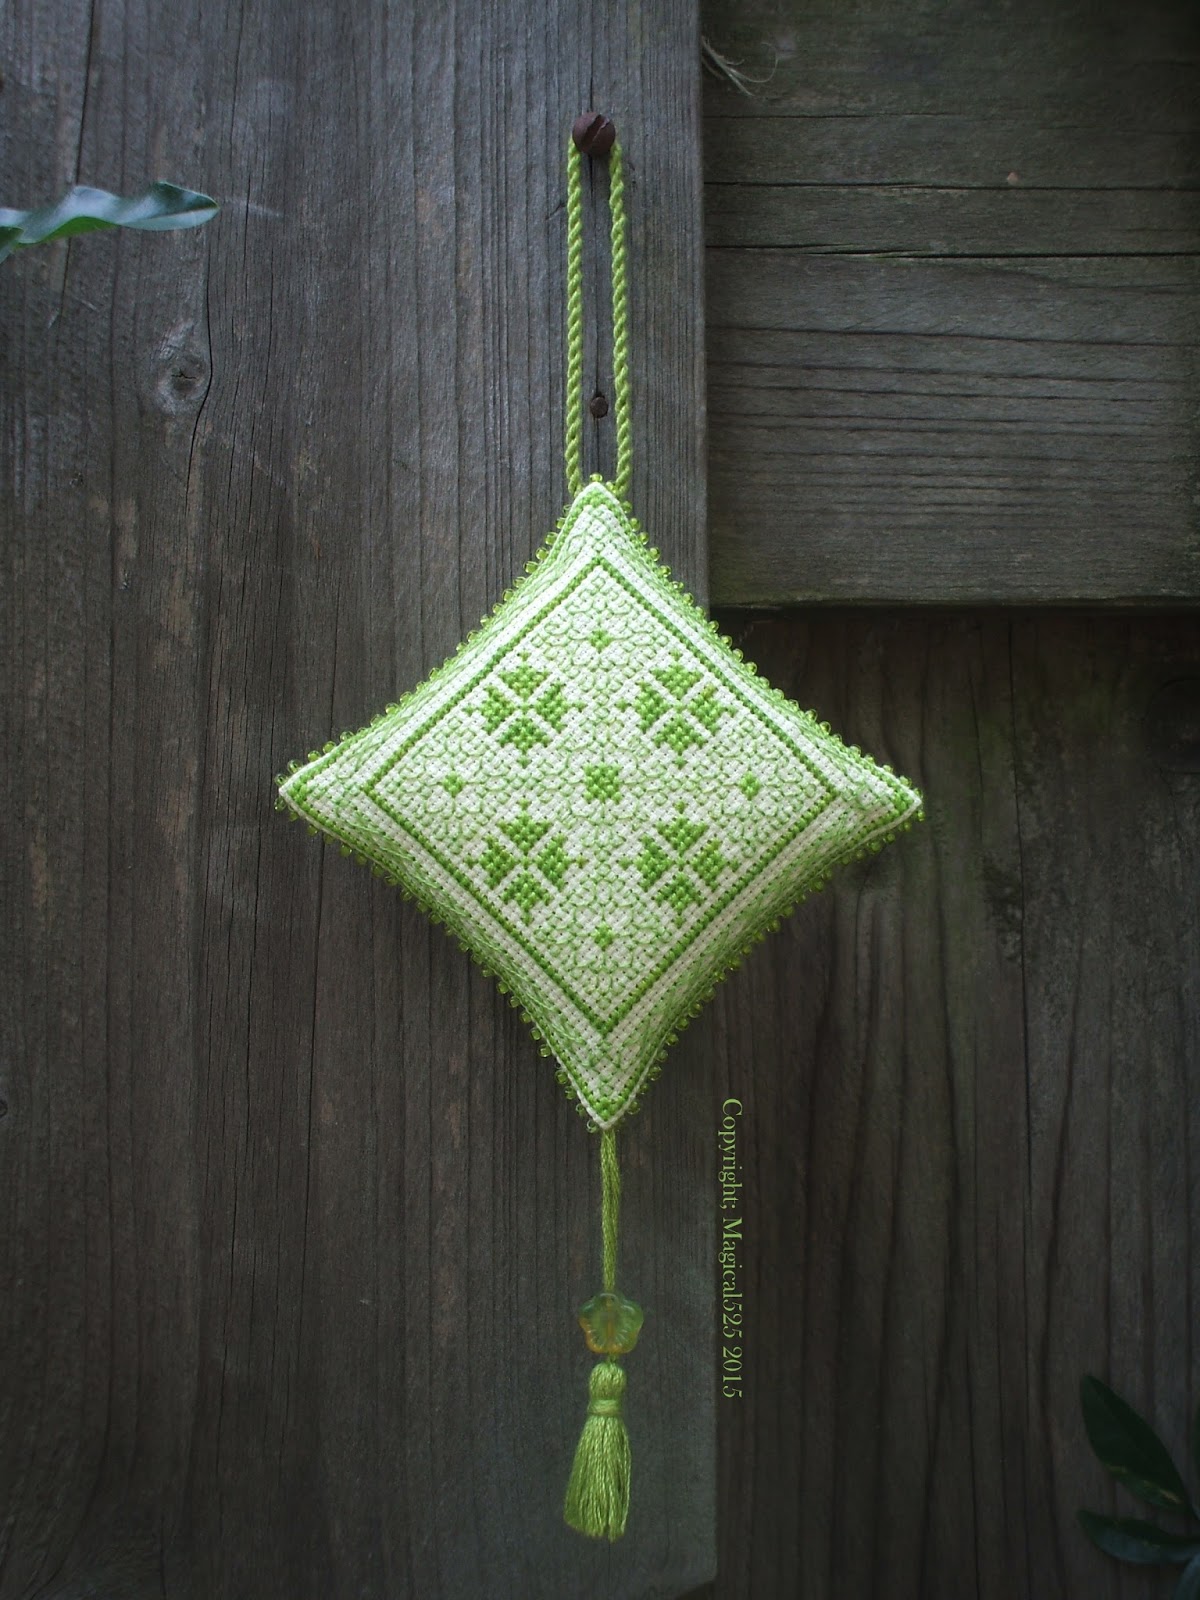
The August ornament was stitched on 16ct antique white Aida with 3 colours of DMC - pattern can be found here: Ornament of the Month - August - The hanging loop and tassel were made with green craft thread, the beads are size 11 seed beads and there is a green flower bead on the tassel. The finished size is 3". As is becoming a bit of a habit I've not yet stitched the garland ornament, summer stuff seems to have really slowed me down.
Not sure when my next post will be but I'm pretty sure that I need to catch up on my Tons of Tiny and Tusal posts and there is of course still the patterns left for the pincushion and scissor case that go with the Fob a Month pattern I gave yesterday.
Saturday 22 August 2015
Fob a Month - 6


The fob is 1 7/8" square. 34 stitches square.
What you need to make the example above:
- 1 piece of 3 1/2"x 7" 18ct Aida or 32ct linen if you are ONLY stitching the fob - otherwise see above for the amount needed.
- DMC 3347 and 3348
- Your stuffing of choice
- DMC 3347 for the cord and tassel
- Green seed beads
- 2 small crystal bicones
Instructions: Fold the fabric in half before starting - on each half you will stitch either the back or the front at least 1/4" away from the centre line so you have 1/4" seam allowance for each side. Once the cross stitching is done do the back stitch outlines.
Press the completed stitching from the back to make sure there are no creases. Then cut the pieces out 1/4" away from the back stitch lines.
Place the 2 pieces wrong sides together and fold the seam lines between the layers and whip stitch the 2 sides together only going through the back stitch lines, the same as you would for a biscornu, adding a green bead every other stitch, remembering to add the cord and tassel at opposite corners. (Believe me if you do forget things either get pretty complicated or you end up ripping out a whole load of stitches)
When you are about 1" away from the starting point take a moment to add some stuffing, you want it plump but not too plump. Then finish sewing the last bit of seam.
Last of all sew the 2 beads in the centre of each side using a single thread to stitch them in place by going through each side's bead, then through to the other side and repeating that 2 or 3 times for each bead.
I hope you enjoy this pattern, please do share a link to yours if you make it!
Wednesday 12 August 2015
Ornament of the Month - July
I have to admit that I was more than a bit surprised when I noticed that I had not yet posted about the July ornament here - mostly because I had finished the August one last night and came to post about that and found I actually had 2 posts still to make. I did consider doing them together but decided to just inflict you with separate posts.
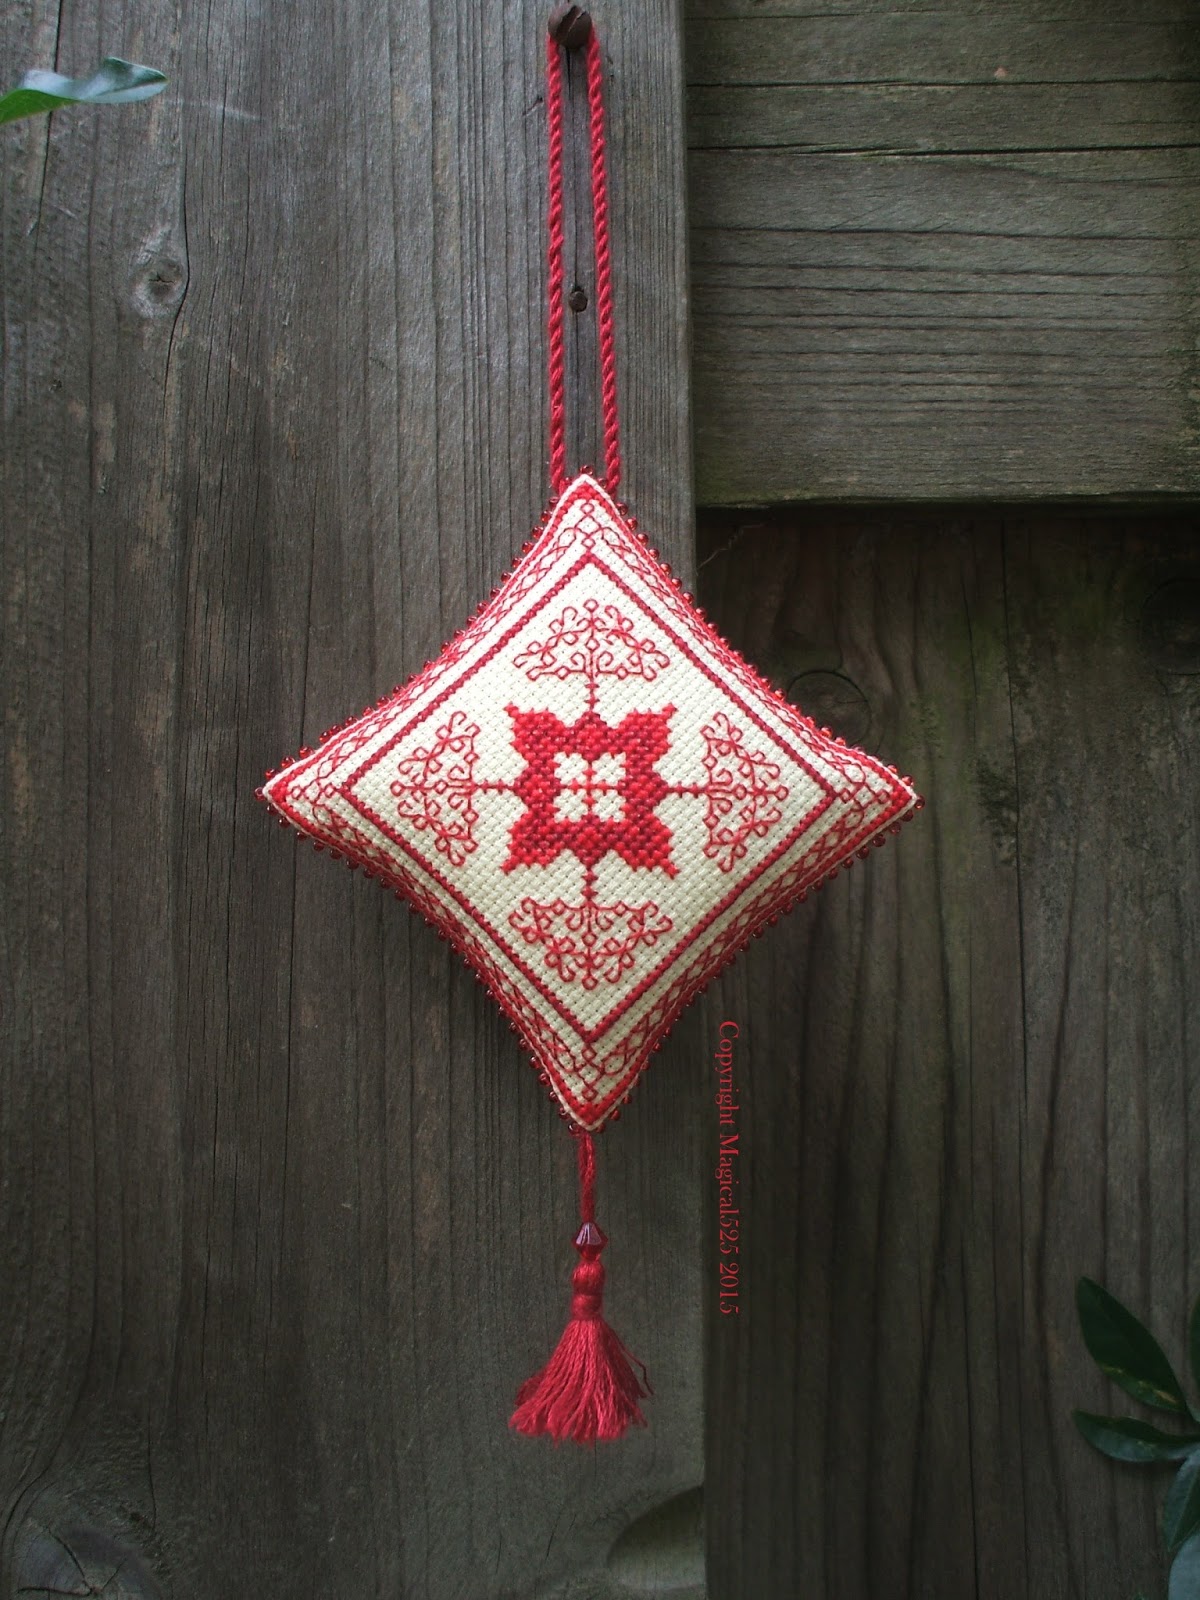
July's birthstone is ruby which is such a lovely red. I did of course have to make sure it didn't look like the January ornament as that, as you may remember, is also red.


On the left you can see the July ornament and on the right the January one - you can easily see the difference in colour - and in pattern! I wanted to make some kind of flower again and I succeeded at making one that, when not on point, looks rather like a poinsettia and surrounded it with bare branched trees on the diagonals.
The July ornament was stitched on 16ct antique white Aida with 3 colours of DMC - pattern can be found here: Ornament of the Month - July - The hanging loop and tassel were made with red craft thread, the beads are size 11 seed beads and there is a red bicone on the tassel. The finished size is 3".
I have not yet stitched the second ornament - this seems to be something happening more often as I'm so busy lately but I hope to catch up with making ornaments soon. It and the other ornaments I need to make are all kitted up and awaiting attention.
I do hope you are enjoying this series of patterns - I know I am even though I'm having a hard time keeping up with what I want to make.
I will be back soon with the August ornament!
Monday 10 August 2015
A Fob a Month - 5
As some of you may have noticed the July Fob a Month was not posted on the usual date. It was due 3 days before I was due to go on holiday and in the rush to pack there just was no time to post the fob even though I had completed stitching it. Once I got back I had almost forgotten it was due and so here we are several weeks later with the pattern at last!
After the last pattern I decided to make an easier one and felt it was high time the glow in the dark thread came out of the box to play. I stitched it on black even weave to make it show up better but if you prefer you can stitch it with black thread on a light background too.
This year I went to the Hastings Pirate day for the 4th year running and wanted to stitch a fob to reflect my holiday plans which is why I chose the most commonly known "pirate speak" word I know of which is "Arr"

The fob is 3/4" high and 3" wide. 7 x 25 stitches
What you need to make the example above:
- 1 piece of 6" x 6" 25ct black Jobelan
- DMC E940 (glow in the dark) or 310 (black) if you are working on a light fabric
- Your stuffing of choice
- Black craft thread for the cord and tassel (or just use black DMC)
- Black seed beads
- A large crystal bicone
Notes:
- The black lines are the back stitch lines needed to make the fob - for the back of the fob you can either just do the back stitches or do the pattern a second time. I did the back stitches in glow in the dark.
- If you want your fob to *really* glow use a matching Kreinik glow in the dark blending filament - it really does help make it glow!
- I make my tassels by wrapping craft thread a good 10 times around a bit of thick card that is 1/16th inch thick and 1" wide.
- I make the cord by measuring out 5 x the length I want. then I loop it around a knitting needle or chopstick and put that though a slatted chair back to hold it in place while I twist then folding it in half and putting a knot in the ends.

Instructions: Fold the fabric in half before starting - on each half you will stitch either the back or the front at least 1/4"away from the centre line so you have 1/4" seam allowance. This is one of those rare occasions that starting with the back stitching is a good idea.
Stitch the letters making sure you consult the pattern carefully for placement. Then cut the pieces out 1/4" away from the back stitch lines.
Place the 2 pieces wrong sides together and fold the seam lines between the layers and whip stitch the 2 sides together only going through the back stitch lines, the same as you would for a biscornu, adding a black bead every other stitch. On the diagonal lines I added a bead every stitch.
At the first pointy end add the loop and at the other pointy end add the tassel. About 1" before you reach the beginning of your stitching stop stitching and stuff the fob with a filling of your choice, then continue to ship stitch the sides together.
I hope you enjoy this pattern, please do share a link to yours if you make it!
Subscribe to:
Posts (Atom)